Read Time: 9 minutes

What Is VMware?

VMware is a widely used virtualization platform that allows users to create and manage multiple virtual machines on a single physical machine. By using VMware, IT administrators can improve the scalability, efficiency, and manageability of their computing environments.

The main function of VMware is to enable the partitioning of a single physical server into multiple virtual servers, where each operates its own operating system independently. This setup helps organizations reduce hardware costs while enhancing system reliability and providing flexibility in how resources are allocated among applications.

5 Ways to Move VMware VM to Another Host

Here’s a look at five methods to migrate VMs from VMware to other hosts.

Using vMotion for Live VM Migration

VMware vMotion is a feature that enables the live migration of a running virtual machine from one physical server to another with zero downtime, continuous service availability, and complete transaction integrity. It is useful for maintaining operations that require physical server downtime without affecting the virtual machines running on it. 

To perform a vMotion migration, both the source and destination ESXi hosts must be properly configured to share the same storage resources or be part of the same cluster. 

Detailed migration process:

  • Verify requirements: Ensure that both the source and destination ESXi hosts are connected to the same vCenter Server, and they have access to shared storage or are part of the same vSphere cluster.
  • Initiate migration: Open the VMware vSphere Client and right-click the virtual machine (VM) you want to migrate. Select Migrate from the Actions menu.
  • Select migration type: In the Migrate wizard, choose Change both compute resource and storage if you are moving the VM to a different host and datastore. Alternatively, choose Change compute resource only or Change storage only based on your needs.
  • Choose destination host: Select the destination ESXi host where the VM will be migrated. Make sure that the selected host has sufficient resources (CPU and memory) to accommodate the VM.
  • Select storage and network: Pick the appropriate datastore and network settings for the VM at the destination. You can opt for thin or thick provisioning of the virtual disks depending on your storage requirements.
  • Configure vMotion priority: Set the vMotion priority to High for minimal impact on performance during migration.
  • Review and start: Review the migration settings and click Finish to launch the migration process. Monitor the migration progress through the Recent Tasks pane.
  • Completion: Once the migration is completed, the VM will be running on the new ESXi host with no downtime experienced by users.

Cold Migration without vCenter

Cold migration involves moving a virtual machine while it is powered off. This process is used when vMotion is not available, typically in environments lacking vCenter or sufficient licensing. This method requires careful handling of VM files to avoid data corruption and ensures that all necessary files are correctly moved and registered.

Detailed migration process:

  • Shutdown the VM: Begin by powering off the VM that needs to be migrated. Cold migration requires the VM to be in a powered-off state.
  • Access datastore: Log in to the VMware Host Client on the source ESXi host. Navigate to the datastore where the VM files are located.
  • Download VM files: Using the datastore browser, download the VM’s .vmdk, -flat.vmdk, and .vmx files to your local machine. Ensure that all related virtual disk files are downloaded.
  • Upload to destination host: Log in to the VMware Host Client on the destination ESXi host. Create a new directory in the desired datastore and upload the VM files to this directory.
  • Convert virtual disk (optional): If needed, use the vmkfstools command to convert the uploaded virtual disk to thin provisioning to save storage space.
  • Register the VM: After uploading, right-click the .vmx file in the datastore browser and select Register VM. This will register the VM on the destination ESXi host.
  • Start the VM: Power on the VM on the destination host. Verify that the migration was successful by checking the VM’s functionality.

This is part of a series of articles about VMware migration

Using VMware Converter for Cold Migration

VMware vCenter Converter is a standalone tool that transforms and consolidates physical machines and other virtual machine formats into VMware virtual machines. It can also migrate VMware VMs between hosts and data centers, or between on-premise and cloud environments. 

Detailed migration process:

  • Prepare VMware Converter: Install VMware vCenter Converter Standalone on a machine that can access both the source and destination ESXi hosts. Ensure network connectivity and administrative access to both hosts.
  • Launch conversion wizard: Open VMware Converter, click Convert machine, and choose Powered Off as the source type. Enter the IP address of the source ESXi host and provide the necessary credentials.
  • Select source VM: Choose the VM you want to migrate from the list of available VMs on the source ESXi host.
  • Define destination: Select VMware Infrastructure virtual machine as the destination type. Enter the destination ESXi host’s IP address and credentials.
  • Configure VM settings: Set the destination VM’s name, datastore, and hardware configuration. You can adjust options such as disk provisioning, network settings, and customization.
  • Start migration: Review the configuration and start the conversion process. VMware Converter will shut down the source VM, copy its data, and create a new VM on the destination host.
  • Verification: After the conversion is complete, verify that the new VM is operational on the destination ESXi host.

VM Migration Using Templates

VM templates are used to deploy standardized and pre-configured VMs across multiple hosts. Templates can be used repeatedly, ensuring consistent configurations across deployments, beneficial for scaling and testing environments.

Detailed migration process:

  • Export the VM: On the source ESXi host, open VMware Host Client and navigate to the list of virtual machines. Right-click the VM you want to migrate and select Export. This will create an OVF template that includes the VM’s configuration and disk files.
  • Download files: After the export starts, download the generated files. These typically include .ovf, .vmdk, and .mf files.
  • Create a new VM on the destination host: Access the destination ESXi host using VMware Host Client and click Create / Register VM. Choose the option Deploy a virtual machine from an OVF or OVA file.
  • Upload the files: Provide the previously exported .ovf and .vmdk files from your local storage. Enter a name for the new VM, and select a datastore on the destination host to store the VM files.
  • Configure deployment: Select the appropriate options for storage provisioning (thin or thick) and configure the network connection. If required, choose whether to automatically power on the VM after deployment.
  • Complete the migration: Review the configuration settings, then click Finish. The VM will be imported and registered on the destination host.

VMware PowerCLI for Advanced Automation

VMware PowerCLI provides a command-line interface and scripting environment for automating all aspects of VMware vSphere management, including VM migrations. It is suitable for environments requiring frequent migrations, complex operations, or where multiple VMs are managed simultaneously.

Detailed migration process:

  • Connect to server: Launch the PowerCLI console. Use Connect-VIServer to connect to the vCenter Server or directly to the source ESXi host.
  • Retrieve VM information: Use the Get-VM cmdlet to retrieve information about the VM you want to migrate. Store this information in a variable.
  • Select destination host: Use Get-VMHost to select the destination ESXi host where the VM will be moved.
  • Initiate migration: Use the Move-VM cmdlet to start the migration process, specifying the VM and the destination host. Monitor the task using Get-Task.
  • Monitor progress: Track the progress of the migration through the PowerCLI interface or the vSphere Client.
  • Disconnect: After the migration is completed, use Disconnect-VIServer to log out from the ESXi host or vCenter Server.

Lanir Shacham
CEO, Faddom

Lanir specializes in founding new tech companies for Enterprise Software: Assemble and nurture a great team, Early stage funding to growth late stage, One design partner to hundreds of enterprise customers, MVP to Enterprise grade product, Low level kernel engineering to AI/ML and BigData, One advisory board to a long list of shareholders and board members of the worlds largest VCs

Tips from the Expert

In my experience, here are tips that can help you better manage VMware migrations:

Pre-migration performance benchmarking

Run performance benchmarks on critical VMs before migrating to establish baseline metrics. Post-migration, compare these metrics to ensure the VM performs as expected in the new environment, allowing for early detection of performance degradation.

Optimize storage paths for vMotion

When using vMotion, make sure the storage paths are optimized by configuring multiple datastores or shared storage clusters. This helps distribute I/O workloads and reduces storage bottlenecks during live migrations, especially in high-traffic environments.

Utilize cross-vCenter vMotion for larger environments

For enterprise-scale migrations, consider using cross-vCenter vMotion to facilitate seamless migrations across different vCenters. This method is ideal when migrating between data centers or managing multi-site environments without downtime.

Isolate migration traffic

To avoid performance impacts on production workloads, use a dedicated network for migration traffic. This ensures that regular operations and migrations do not compete for bandwidth, reducing risks of network congestion during peak times.

Automate dependency discovery with third-party tools

Use application dependency mapping tools like Faddom or VMware’s own tools to automate the discovery of application and service dependencies. This helps avoid the migration of isolated VMs without their dependencies, ensuring smoother post-migration functionality.

Recommended Process for Migrating VMware VM to Other Hosts 

Organizations can implement the following practices to ensure a successful migration from VMware.

1. Plan and Assess

Before initiating a migration project, it is important to plan and thoroughly assess all aspects related to the VMs involved. This aids in reducing risks and aligning the migration with business objectives:

  • Identify migration goals: Understand the purpose of the migration—whether for load balancing, hardware maintenance, or data center relocation.
  • Inventory assessment: Catalog all VMs, their applications, and dependencies to ensure nothing is overlooked during the migration.
  • Risk analysis: Identify potential risks and create mitigation strategies. Consider compatibility issues, potential downtime, and data loss.
  • Migration strategy: Decide on the migration type—live (vMotion) or cold migration, based on the VM’s criticality and allowable downtime.
  • Scheduling: Plan the migration to minimize impact on business operations, ideally during off-peak hours if downtime is involved.

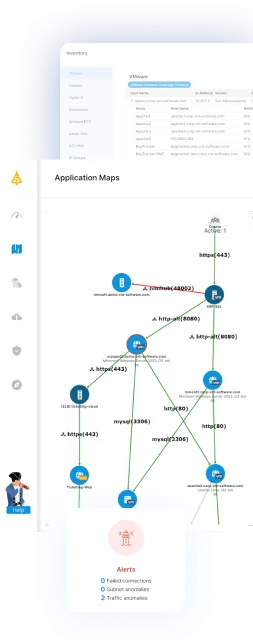
2. Perform Application Dependency Mapping

Application dependency mapping is essential for understanding the interactions and dependencies between applications and services before migrating VMs. This process helps identify critical connections and ensures that all dependent components are migrated together to maintain functionality:

  • Inventory collection: Use tools to automatically discover and catalog all applications running on the VMs, along with their dependencies.
  • Dependency analysis: Identify and document the dependencies between applications, databases, middleware, and other services. This includes network connections, shared storage, and API integrations.
  • Visualization: Create detailed visualization documentation of all dependencies and migration plans. This serves as a reference during the migration and for future maintenance.
  • Impact assessment: Evaluate the potential impact of the migration on these dependencies. Understand how the move will affect application performance and connectivity.

3. Prepare the Environment

Preparing the environment involves setting up the infrastructure to support a seamless and successful migration. This includes ensuring compatibility, establishing necessary connections, and protecting data with backups:

  • Hardware and software compatibility: Ensure that the destination host and storage are compatible with the source VM’s hardware version and configuration.
  • Network configuration: Set up proper network mappings between the source and destination to ensure connectivity post-migration.
  • Backup: Perform comprehensive backups of the VMs to be migrated. This ensures data integrity and provides a rollback point if needed.
  • Pre-migration testing: Conduct a test migration if possible. This can help identify potential issues before the actual migration.

4. Use the Right Migration Tool

Choosing the appropriate tool can simplify the migration process and helps ensure that it is conducted efficiently and with minimal risk of data loss or downtime. When evaluating migration tools, consider the following:

  • Tool selection: Depending on the VMware version and the specifics of the VM (e.g., operating system, configuration), select the most appropriate tool. For example, choose vMotion for live migrations without downtime, vSphere Client for offline migrations, and VMware Converter for complex migrations involving conversions or reconfiguration.
  • Licensing and features: Verify that the current VMware setup has the necessary licenses for the chosen migration tools.
  • Tool configuration: Configure the tools according to the requirements of the migration plan. This includes setting up profiles or templates if using automated migration processes.

5. Execute Migration

Execution is the active phase where the planned migration actions are implemented. This step requires careful management of resources and immediate response to any issues that arise to ensure a smooth transition:

  • Initiate migration: Start the migration process using the selected tool, ensuring that all parameters are set according to the plan.
  • Manage resources: Monitor resource usage such as CPU, memory, and network bandwidth to avoid overloading the infrastructure during the migration.
  • Troubleshoot issues: Address any issues that arise during the migration promptly to minimize downtime and impact.

6. Monitor and Validate

Monitoring the migration process and validating the outcome are critical to confirm that the VMs are functioning as expected in their new environment. This step involves detailed checks and troubleshooting to address any issues that surface during the migration:

  • Tracking: Use the VMware vSphere Client or other monitoring tools to track the progress of the migration and catch any errors.
  • Validation: Once the migration is complete, validate the functionality and performance of the VM in its new environment.
  • Error checking: Check logs for any errors during the migration and address them. Ensure that all VM services are running as expected.

7. Optimize Post-Migration

After the migration, it’s important to optimize the new setup to ensure that the VMs are operating efficiently. This involves fine-tuning the configuration, cleaning up residual setups, and updating documentation to reflect the new state:

  • Performance tuning: After the migration, monitor the VM’s performance and adjust resources as necessary to optimize operations.
  • Cleanup: Remove any unnecessary files or configurations left from the old environment.
  • Documentation: Update documentation to reflect the new settings and any changes made during the migration process.
  • Final testing: Conduct thorough testing to ensure that all systems operate correctly in the new environment and that there are no security or connectivity issues.

Related content: Read our guide to application migration tools

VMware Migration Made Easy with Faddom

Faddom’s application dependency mapping is a valuable addition to VMware migration projects, providing essential insights before moving workloads. It automatically discovers all VM instances and their dependencies, helping you understand the impact of migration on your applications and services. Faddom is agentless, requires no credentials, and operates in real time, keeping maps updated 24/7 with minimal effort.

Starting at an affordable $10K/year, Faddom simplifies the migration process, allowing a single person to map an entire data center in under an hour. This comprehensive visibility ensures smoother, more efficient VMware migrations with reduced risk and downtime.

Learn more about Faddom for data center migration or try it yourself with a free trial!