Nutanix and VMware are the two biggest names in the hyperconverged infrastructure (HCI) market and predominant players in cloud virtualization platforms. Each platform offers numerous benefits but also potential drawbacks, depending on the different needs and goals of the enterprise. In short, where both Nutanix and VMware provide similar benefits, they do so by different means.
It’s just as common to find both platforms being used alongside each other in the same environment as it is to find an enterprise migrating from one to another. That said, there are some basic reasons companies choose to migrate from Nutanix to VMware, including cost, flexibility, complexity, support, and familiarity. In the wake of Broadcom’s pending finalization of the purchase of VMware, long-term strategic alignment may even play a role in the decision. No matter the reason, there are several best practices for migrating from Nutanix to VMware.
Table of Contents
ToggleKey Steps in the Nutanix to VMware Migration Process
Migrating from Nutanix to VMware can be complex, but it is possible to complete the process with minimal disruption. Below are the general steps involved in the process.
1. Assess the Current Environment
Completing an assessment has many moving parts because an environment can consist of VMs running in on-premises data centers, public clouds, private clouds, or a hybrid. Hybrid cloud use continues to grow because of the many benefits to an enterprise. To complicate matters further, cloud users are becoming more discerning about factors like costs. For example, growing workloads in the cloud eventually cost more than keeping them on-premises or in private clouds. That’s a major reason why many companies are leaving the cloud and doing cloud repatriation.
Identifying the current Nutanix environment involves hardware specifications, such as the number and type of nodes, processors, memory, and storage capacity. Then there are the software versions and configuration, including the hypervisor version, the Nutanix AOS version, and network and storage settings.
An assessment must also inventory VM configurations, like the number of virtual machines, operating systems, and resource allocation for each virtual machine. Finally, applications, workloads, and their dependencies (including application version, database type, and network and storage requirements) must be considered.
Nutanix offers several tools that provide reporting and management options for VMs and clusters across environments: Nutanix Prism, Nutanix Central, Nutanix Cloud Clusters platform (NC2) (which is designed specifically for unifying a hybrid cloud cluster environment), and VMware vRealize Operations are just a few. With a comprehensive view of Nutanix infrastructure, including physical, virtual, and network components, Nutanix Prism is a great starting tool.
One challenge is that each of these tools has limitations in scope and not all of them integrate with other platforms. While 60% of IT teams leverage multiple IT infrastructure environments, just 40% of that total report complete visibility. The use of multiple tools for discovery and mapping can bloat the process, add complexity, and still leave gaps. That’s why a single, comprehensive application discovery and mapping tool is generally the best tool for environment assessment.
2. Complete Application Discovery and Dependency Mapping
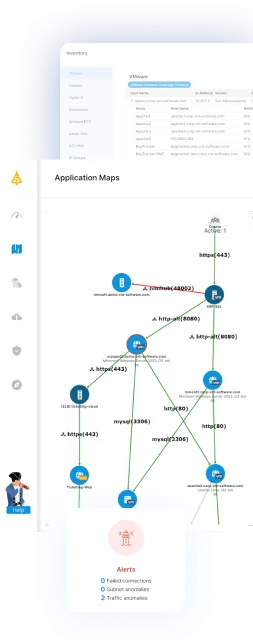
Application mapping and discovery are crucial steps in any data center migration, including the migration from Nutanix to VMware. These steps involve identifying all the applications and services that run on the virtual infrastructure and understanding their interdependencies and resource requirements.
There are multiple benefits to this holistic approach. Identifying all the applications that run across any environment—along with their workload and services dependencies—enables IT to determine the resource requirements for each application and size the VMware infrastructure accurately.
3. Create a Migration Plan
One cornerstone of a migration plan is the prioritization of critical IT infrastructure, workloads, applications and their dependencies and services by developing a detailed migration sequence. The migration sequence enables the migration team to reduce potential downtime as part of the overall migration plan.
Developing an effective migration timeline provides an execution and process sequence, which helps the migration team avoid potential roadblocks uncovered by the ADM tool’s Nutanix infrastructure map. It is also possible to plan hardware and software updates to take place during the migration process to the VMware environment.
4. Set Up the VMware Environment and Prepare Workloads for Migration
Migration and design teams can configure the new VMware environment in countless ways, tailoring the original Nutanix environment design to a business’s goals. However, there are some constants in the environment setup, such as installing and configuring the VMware vCenter Server and ESXi hosts according to the organization’s hardware and networking requirements. The next step is to create a cluster(s) in VMware vCenter that meets a company’s unique requirements. Matching the storage of the Nutanix environment, which involves conversion to the appropriate format for VMware, is one example. This is where potential upgrades can create greater cost efficiencies, as well as business outcome efficiencies, in the VMware environment. At this stage, the migration team will back up the Nutanix environment to make a copy of all data in case of migration problems.
5. Migrate the Workloads
Migrating the Nutanix environment to VMware involves using the VMware vCenter Converter Standalone tool for conversion and configuration. Networking and security must also be configured to match VMware to the Nutanix environment, which enables testing the migrated VMs to ensure they are working correctly in VMware.
As previously mentioned, migration teams can use a variety of tools for the migration process, including VMware vCenter Server, VMware ESXi hosts, VMware vSphere Client, VMware vCenter Converter Standalone tool, and Nutanix Prism. Aside from deciding on a suite of tools, teams must also determine which version of VMware to use for the environment, whether to use a single or multiple clusters, and whether to use VMware vSAN or external storage for the environment. These are complex choices that require a deep understanding of both environments on a micro level for a successful migration.
6. Test the Migrated Workloads
It’s clear that migrating a virtual environment from Nutanix to VMware is no small feat. Teams must carefully plan and execute to ensure a seamless transfer of all data, configurations, and virtual machines; but the work doesn’t stop there. After the migration is complete, testing should begin.
Validating the migration process is the first step. The team should determine all data has been migrated correctly, all virtual machines are present and functioning properly, and all configurations have been retained.
Next, the migration team will test the functionality of each VM, node, and cluster in the VMware environment. This major step involves verifying that all applications, services, and systems are working as expected. The process also requires verification that all integrations with other systems, such as databases or external APIs, are functioning correctly. The team can then move on to VMware environment performance testing by conducting benchmark tests that compare the new environment to the Nutanix environment.
Security testing of the new environment involves reviewing access controls, firewall configurations, and other security settings to ensure that they meet organizational standards. Finally, disaster recovery testing is a vital part of security testing. Running failure scenario simulations that range from power outages to network and hardware failures helps the migration team align the new environment with organizational recovery time objectives (RTOs) and recovery point objectives (RPOs).
7. Optimize the VMware Environment
To ensure an organization reaps the benefits of a fully optimized environment, everything from CPU and memory allocation to storage and network setting adjustments play a crucial role. For example, verifying that storage matches workload needs can improve the performance of VMs, nodes, and clusters. Network performance optimization, on the other hand, requires the team to set up VLANs and configure network load balancing and network adapters.
Optimization is an ongoing process that involves proactive monitoring with tools like vCenter Server to identify and address issues before they cause significant disruptions. This server management software works best in conjunction with application mobility platforms that continually map and discover the entire IT, application, and workload environment to see how it is changing based on usage.
8. Decommission the Nutanix Environment
Once testing and optimization are complete, decommissioning the Nutanix environment is the final part of the migration process. This starts with shutting down all VMs running on the Nutanix environment. Decommissioning can involve different tools, like the management interface, which can shut down each VM and then power down each node or cluster. The team will then disconnect the nodes from the network and power source, followed by uninstalling the Nutanix software from each node. This process includes the removal of the hypervisor, management interface, and any other Nutanix software components.
The team can then dispose of unused Nutanix hardware by returning it to the manufacturer or recycling it. Like all aspects of the migration process, decommissioning may have many variables for each organization. Regardless of unique needs, IT infrastructure, application, and dependency mapping play an important role from the first assessment to the new VMware optimization stage.
Smooth Migration with Application Dependency Mapping
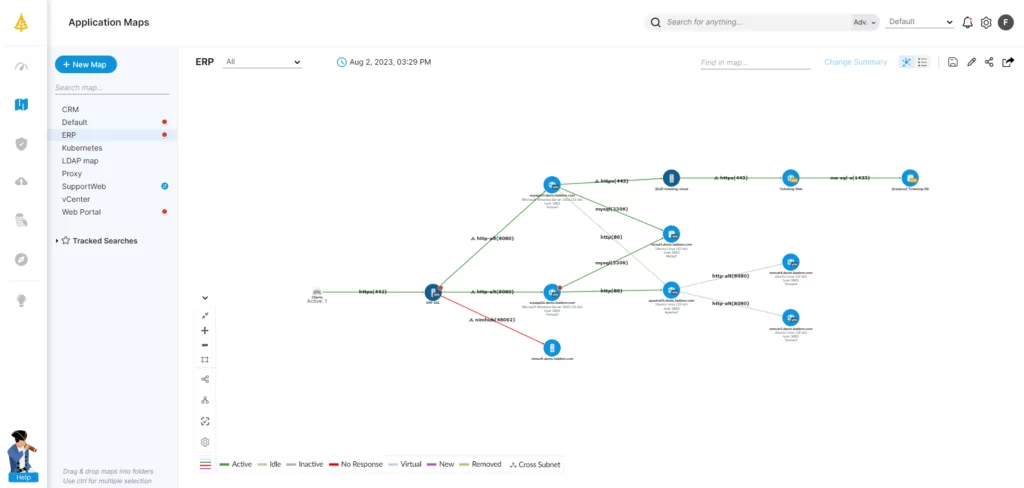
One of the most essential parts of the Nutanix to VMware migration process is the identification of relationships and dependencies between applications and their underlying components, starting at the initial environment assessment phase.
The need for application dependency mapping continues in the testing phase and throughout the management phase. Simply put, Nutanix uses architecture and virtualization technology that is different from VMware, and it is important to ensure that the migration process does not disrupt critical applications or services.
By using an application dependency mapping tool, organizations can create a comprehensive map of all the applications and their dependencies, including virtual machines, network connections, storage, and other resources. This can identify any potential issues or bottlenecks that may arise during the migration process and help migration teams take steps to mitigate them.
Additionally, application dependency mapping can optimize the resulting infrastructure by pinpointing opportunities to consolidate or reconfigure resources, reduce complexity, and improve performance. Application dependency mapping with Faddom leads to a more efficient and cost-effective migration process, as well as a more streamlined and optimized infrastructure.
Faddom can already map VMware, for those who might want to migrate from VMware to Nutanix. And coming soon — Faddom will be able to map Nutanix for those who want to do the opposite! If you’d like to be notified when this feature is released, just let us know at info@faddom.com.
Want to learn more? Just start a free trial today by filling out the form in the sidebar.


